DT X Verta (ft Pantheon): Ep3 Snare Tuning
In this episode, we work together with Verta Collective and George from Pantheon Percussion to share quick tuning techniques and troubleshoot common snare tuning problems. There are many different kinds of methods out there on snare drum tuning, but all of them follow the same fundamental principle – ensure even application of pressure on the drum head to get a consistent sound. This quick five-minute method can work not only on the snare but also on the whole drumset. George will also be sharing his secret formula to allow him to get consistent tuning every time. Before watching this video, make sure you understand the different technical terms and factors that affect the drum sounds from our first two episodes.
-> Learn more drum tones in our first episode with Pantheon Percussion
-> Learn more drum heads in our second episode with Pantheon Percussion
Content
Tuning Concept
*Before you attempt to understand the tuning concept, make sure you familiarize yourself with the different terms used on the drums. You can find out the different definitions from our Ep1 and Ep2.
When you hit the drums, what you are hitting is the drum head. The drum head (or skin) is the membrane that sits on top of the drums. The tighter the head is, the higher pitch you will get from the drum and vice versa.
Tuning drums is slightly different from tuning a guitar. When you tune the guitar, the bridge holds on to one end of the string while you tighten the string from the other end, often via the peg. However, when you tune the drum, you are trying to apply pressure on multiple sides of the drum head to have a consistent pitch all around. How many sides you need to tighten is dependant on the number of lugs (and tension rods) your drum has. We have discussed this quite extensively in Episode 1. If you tighten the drumhead with no consideration of spreading the tension evenly, you will get a lopsided and unevenly tuned drum.
In this video tutorial, the concept of tuning revolves around quarter turns. Making small increments each time evenly across the tension rods ensures the tension to spread out evenly. Keep this in mind as we will be using a simple formula to know how many quarters turn to turn for the top (batter) and bottom (resonant) head.
-> Find out where you can practice on acoustic drums in Singapore
Step One: Finger Tight
Finger tight. We always start by turning each tension rod to finger tight; this helps us have a consistent starting point, which will help when we start tightening the drum head. To achieve finger tight, turn each of the tension rod’s body with your fingers to the best of your ability with your bare fingers. If the tension rod’s exposed body is too little, you can also use special drum keys with little knobs on top to help achieve finger tight.
Below are a few drum keys that have this feature.
Sonor Protean Drum Key
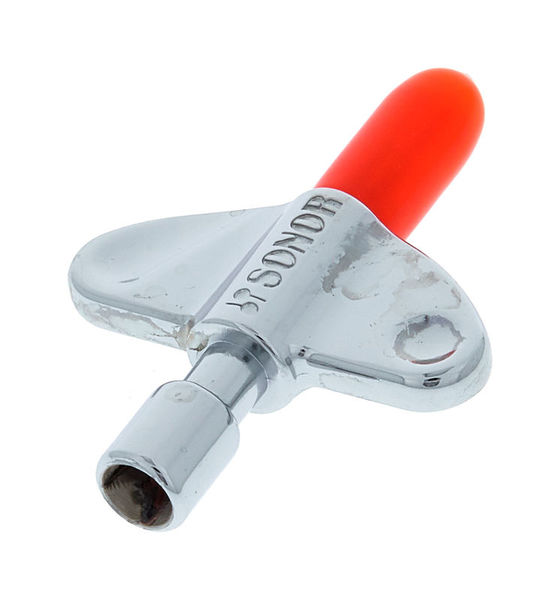
Price: SGD$10
Where: Singapore Drum Shop
Evans DATK Torque Key

Price: SGD$37.90
Where: Sweelee
Step Two: Sitting the Head
Once you have achieved finger tight, you can do compression in the drum head to help sit the drum head. As the drum head is often slightly larger than the shell diameter, compressions in the middle help shift the drumhead to the center, allowing the drum heads to be tensioned evenly when you tighten the tension rods.
Sitting the drum head in this manner has an added advantage of stretching the heads. Stretching the head (for new drum heads) prevents the rods from loosening when the drums are tuned up. Sometimes you might hear cracks from the drum heads when sitting them, that is perfectly normal, and you should not be alarmed by it.
Step Three: Tightening the Tension Rods
Now that the head is stretched and fitted in the middle, and the tension rods are at a consistent starting point (finger tight), now is the time to tighten the drum head up.
Remember the quarter turns that we mentioned earlier? Now is the time to apply the quarter turns around the drums with George’s formula below:
Top head (batter): X number of turns
Bottom head (Resonant): X plus one number of turns
For snare drum, you can start with X being four. Do four quarter turns around the batter head. An important thing to note is that when you are doing the quarter turns, make sure you complete one quarter turn around all the tension rods before starting your second one. Make sure to do two opposing ends with two drum keys to ensure that the head will not be lopsided. If you are unclear about what this means, we highly encourage you to watch the video demonstration above.
If you do not have two drum keys, you can use the same method by tightening the tension rods one side at a time.
Step four: Fine-tuning
At this point, you should have a reasonably even tension all around the drum head. However, you should always check and fine-tune the drum before moving on. To fine-tune the drum, tap the head one and a half-inch away from the tension rod; this will allow you to hear the pitch from that side of the drum head. Listen to the pitch and move on to do the same to the rod beside. You would want to make sure that the two rods’ pitch is similar. If the pitch differs, slowly tighten/loosen the rods until the pitch matches – repeat this process until you have gone a full circle around the drum.
Resonant Head
Now that you have tuned up your batter head, repeat the same process for the resonant head. The process is the same, except for a few minor differences. Remember to add one more quarter turn from the number of turns you have made on the batter side.
Some things to take note of as well when tuning the resonant head:
- During step 2, do not use too much force when sitting the drum head. The resonant head is much thinner than the batter head; using too much force will cause indentation on the resonant head and effectively spoil the drum head.
- When fine-tuning or checking the pitch of the resonant head, remember to pull up the snare wire to allow the head to ring.
And you’re done! This process should take you no more than 10 mins.
Other Methods and Troubleshooting
There are tons of other methods out there to learn, but they all follow the same fundamental theory. Some notable methods that you can experiment with are:
Tuning in a star shape pattern
It would allow even tension across the drum, following a similar theory as tuning the opposing lugs.
Tuning the bottom head all the way up
To ensure the snare’s sensitivity while using the batter head to control the pitch of the drums.
You can also try experimenting with different tuning methods that you find online and see what suits you the best.
One quick fix that you can try to do when tuning the snare if you find that the snare is not sounding right is to try to tune up the bottom head. You will find a lot of times that this quickly solves the problem.
Below are a few reference videos you can watch to understand better how to tune your snare a little bit better.
Summary
There are tons of different tuning methods out there to set you off on your tuning journey. However, you will find that the principle that lies behind these methods is often the same – to achieve even tension all around the drums. The most challenging part of tuning the drum is fine-tuning the tension rods effectively – for you to solve this problem, you need lots of practice to understand how each small little turn can affect the tuning of each tension rods. Or you could head on down to Pantheon Percussions next free workshop and have them guide you hands-on in the whole process.


